Tuesday, December 27, 2011

Braised Pork Belly (Fresh Bacon)

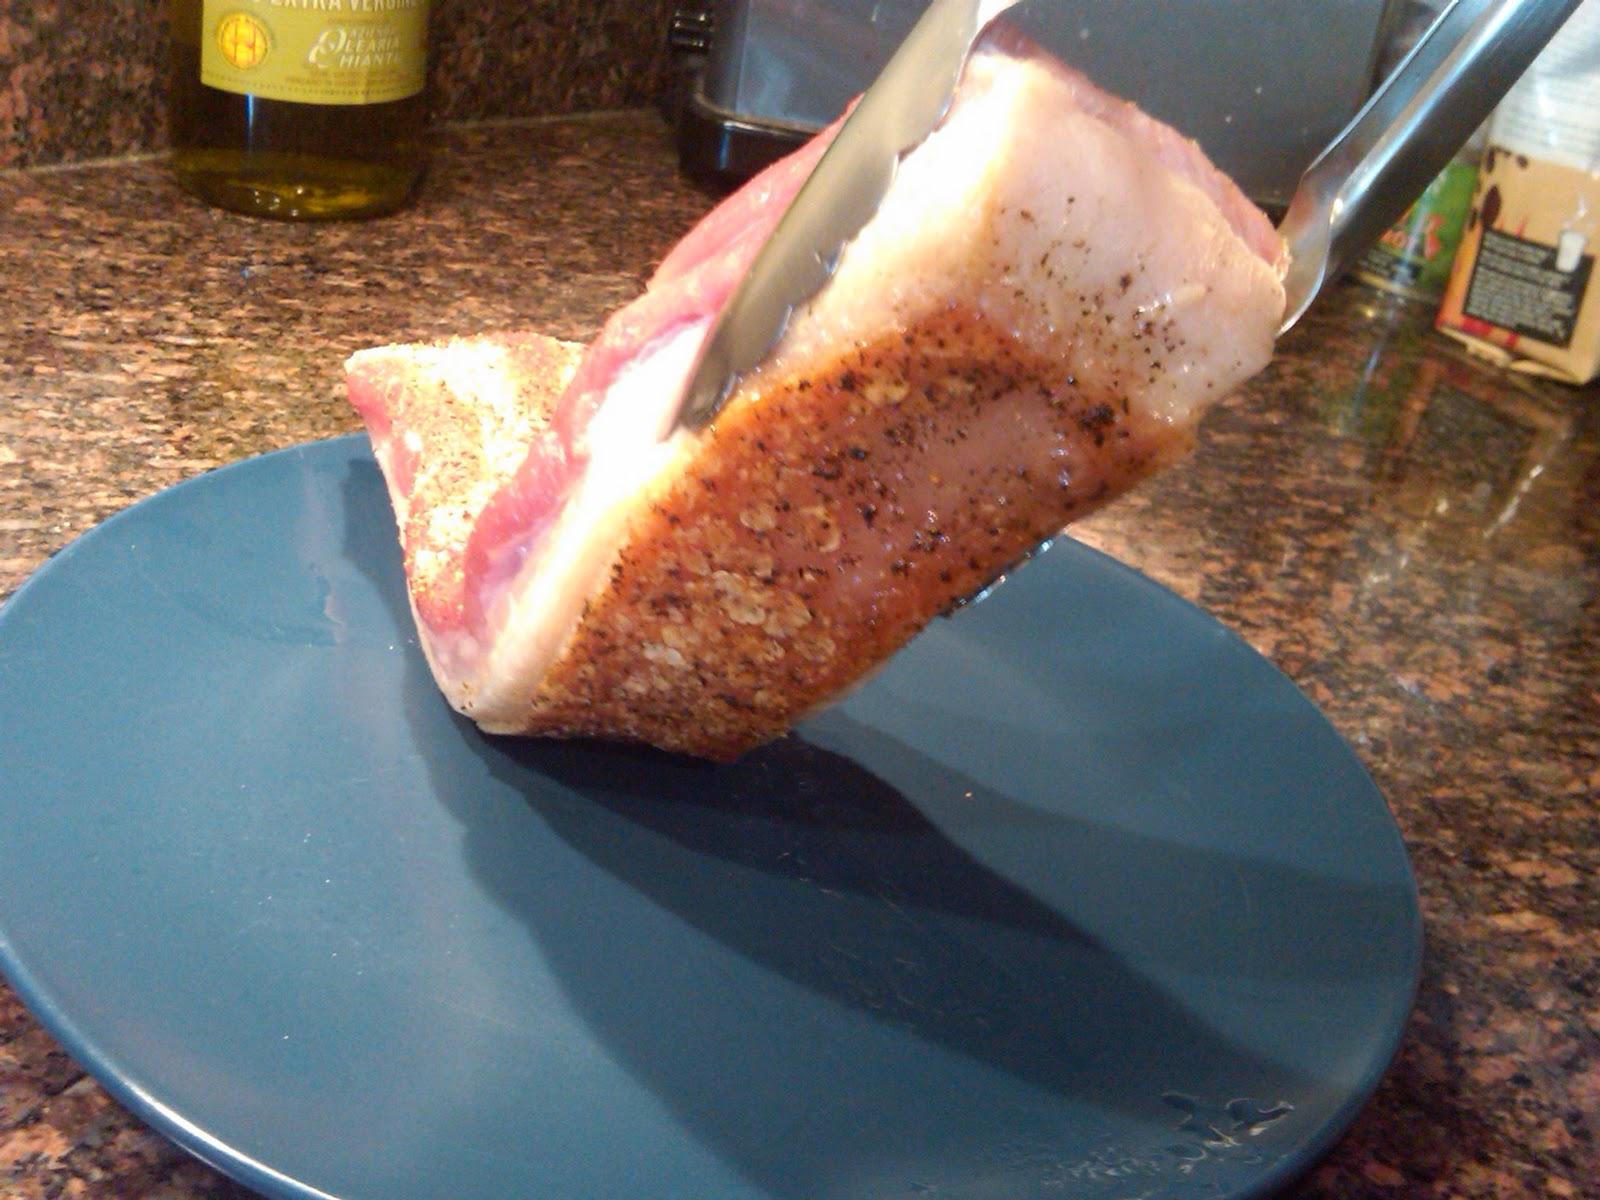
Anyone who knows me, knows that I love bacon. Pork belly, also known as "fresh bacon," is simply uncured slab bacon. It's where bacon comes from, so it follows that I would love it just as much as I love its smokey, crispy, mouth-watering relative. To no one's surprise, it turns out that I do.

Braised for hours in stock and aromatics, pork belly can be as tender as fillet of beef, but with so much more flavor. Just like a strip of bacon, the belly is composed of layers of fat and meat. Slow cooking helps to soften the tough layers of meat, while also infusing the tender layers of fat with the flavors of the braising liquid. When I buy belly, I try to look for pieces that have a good balance of fat and meat. Too much fat can be overwhelming in the mouth, and too much meat can result in a dry final product.

This recipe is based on Tom Colicchio's recipe for fresh bacon in "Think Like A Chef." The first few times I attempted Colicchio's recipe, I was always happy with the belly itself but couldn't quite nail the sauce. The original recipe finished the belly by browning it in a hot oven with the braising liquid still in the skillet. Something about putting that beautiful sauce in a hot oven ruined it every time. As a solution, I strain my braising liquid into a small sauce pan and gently reduce on the stove top until I get it just right. Meanwhile, I brown the belly with a little bit of extra stock, instead of my precious sauce.

The belly can be prepared through step 3 and held for several hours before completing. When buying pork belly, be sure to ask your butcher to leave the skin on. Also, try to pick a piece of belly that is relatively uniform in thickness. Pork belly is so cheap, don't be afraid to buy more than you need and trim it down to the choicest pieces at home. Serve with mashed potatoes, soft polenta, or our polenta cakes.
 

Ingredients

1 tablespoon canola oil
Kosher salt
Freshly ground black pepper
2 pounds pork belly, skin on
1 onion, roughly chopped
2 carrots, roughly chopped
2 celery stalks, roughly chopped
1 leek, white and light green part only, roughly chopped
6 garlic cloves, peeled
 
4 cups chicken stock


Instructions
  1. Heat oven to 350°F. Heat the oil in a large ovenproof skillet over medium heat until shimmering. Generously season the pork with salt and pepper. Add it to the pan, skin side down, and cook until the skin is well browned, about 15 minutes. Transfer the pork to a plate.
  2. Pour off all but about 2 tablespoons of the fat and add the onion, carrots, celery, leek, and garlic to the skillet. Cook the vegetables, stirring occasionally, until they are tender and beginning to brown, about 20 minutes. 
  3. Return the pork belly to the skillet, skin side down and fat side up, and add about 2 cups of stock (it should surround but not cover the meat). Bring the stock to a simmer, then transfer the skillet to the oven. 
  4. Gently simmer the pork, uncovered, for 1 hour, then add another cup of stock. Continue cooking until the pork is tender enough to cut with a fork, about 1 hour longer.
  5. Remove the skillet from the oven and allow the pork to cool in the braising liquid. This will take at least one hour.
  6. When ready to complete, increase the oven temperature to 400°F. 
  7. Remove the pork from the liquid, then gently lift off and discard the skin (use a small knife to separate any pieces that don’t come away from the fat easily). Score the fat, making crosshatch incisions, then cut the pork into 4 portions. This is rich stuff, so I recommend serving no more than one, 2-inch square piece to each guest.
  8. Strain the braising liquid through a fine mesh strainer into a small saucepan and discard the solids. Bring to a simmer over medium-low heat and reduce to a sauce-like consistency, skimming off any fat that rises to the surface. 
  9. Meanwhile, return pork, scored side up, to the skillet. Pour the remaining 1 cup of stock around the pork and transfer to the oven. Allow to cook, without basting, until the pork is heated through and the fat nicely browned, about 20 minutes.
  10. Serve the pork in shallow bowls with some of the sauce ladled over the top and around the meat.

Thursday, December 22, 2011

Pignoli Cookies (Pinenut Cookies)

Recently, TK and I got to go on the trip of a lifetime to Tuscany. This was my first time in Italy, and now, NOW, I get why everyone talks about Italian cookies and why they are the best things in the world. Now I understand why they are not the same as the powdered sugar balls you get every Christmas, and that deceptively simple looking cookies pack a ton of surprising and wonderful flavor. The answer, boys and girls, is almond paste.

I dislike Marzipan. I think it is overly sweet and somehow texturally off. So perhaps it is not surprising that I have shied away from almond paste. Maybe I just needed to grow into it. You can't always expect a nine-year old to get a subtle thing like almond paste. But now, I have figured out that almond paste is both what makes my favorite coffee cake from Germany delicious AND the secret behind pine nut cookies. You don't necessarily look at the pine nut, flavor enhancer to pestos everywhere, as a sweet thing. But it really works in combination with the sweet almond paste and meringue of the egg whites.

You would be amazed at how difficult it is to find good Italian recipes. There is a glut on the market for all things Italian, but so many of them are based off of what Americans consider Italian food to be, or even worse, as easy food for people who don't know how to cook. Every corner than can be cut is cut. This is not to say that my quest for a good Italian cookbook can't be met. I'm just really really intimidated by what happens when you search for "Italian cookbook" on Amazon, and the reviews are no help because so many of the people looking are not really looking what I'm looking for. I don't want easy Italian food. I'm not really interested in the best marinara. I want to learn how to make that delicious pear and ricotta cake that blew my mind.

So here is my first attempt at pignoli cookies. There are both crispy and chewy varieties of pignoli cookies. I fell in love with the chewy, straight up almond paste ones that were a ball of pine nuts. It seems much easier to find recipes for the crispy and more meringue ones. This are the other, more chewy cookie. I am pushing it away from the original recipe and towards my goal by adding more almond paste and cooking for less time (the main difference between a chewy pignoli cookie and a crispy one). So just trust me on this one, and try this recipe. 


Make sure you get pure almond paste, not marzipan, and NOT almond filling. Also lean towards the almond paste that comes in a can or tub rather than the tube, which tends to be dryer. This is surprisingly easy to make, as it is a food processor recipe. The dough will be extremely sticky. it'll stick to your fingers, everything. The pine nuts will give it its shape and cookie-ness. Don't worry if it sticks to your hand. These cookies mean business, and are a messy affair.

Pignoli (Pine Nut) Cookies

After blending with sugar/flour
Chunky from the can
Ingredients
12 oz of pure Almond paste (NOT Almond filling and NOT Marzipan)
1/2 cup granulated sugar
1/2 cup of powdered sugar
1/4 cup of flour
3 egg whites, lightly beaten
10-12 oz Pignoli (Pine Nuts)


Cooking Time: 30 minutes active, 40 minutes inactive Makes 24-30 cookies


Instructions
  1. Add almond paste to food processor. Paste will break up in chunks. Pulse processor several times then grind until chunks are completely broken up. 
  2. Pulse the powdered sugar and the flour into the almond paste. Blend until mixture looks like very rough sand. 
  3. Beat egg whites lightly for 1-2 minutes in small bowl with whisk.
  4. Add egg whites and process until dough comes together.
  5. Scoop out a small piece of dough (about a small spoon). It will be very sticky. Slide off of spoon and roll in pine nuts till completely covered, and place 2" apart on cookie sheet lines with parchment paper. 
  6. Bake 300 degrees about 25 min. Remove to wire racks to cool, then keep covered. 
  7. Freeze cookies if you're not going to use them right away, then take out as needed.

Happy Baking!!!

Sunday, December 18, 2011

Bacon Wrapped Dates with Honey Mascarpone

These dates are the hit of our holiday party every year. I first made them after learning that Talula's in Arlington had stopped serving bacon wrapped dates. This was unacceptable, so I had to learn how to make my own bacon-date combination. This is what I have come up with. My first attempt I used thick-cut bacon. Despite being better in most circumstances , it throws off the proper bacon-to-date-ratio in this recipe. I choose mascarpone because of the texture, mild sweetness, creaminess, and because it handles heat well. Letting the cheese warm to room temperature really made filling the dates much easier and resulted in fewer broken bags, as it requires less squeezing. If your ziploc bag starts to ooze out the edges try cutting around the leak and placing a new bag over the old one to keep the spout small. This is much less messy then dealing with an increasing number of bag leaks or trying to change bags.

A word on selecting your dates: The easiest thing to do is buy the box of pre-pitted dates, but often the pitted organic dates are superior in size and deliciousness. The soft ones are really easy to pit as you slice them open. If your dates are a bit harder (such as the ones my parents bring me back from West Coast date country), they can be obnoxious to pit. I have no specific solution to this. The pre-pitted packages are the easiest to wrap and less dependent on tooth picks, but the awesomeness of a nice, plump date is worth noting. We use raw honey in this recipe. If you haven't stopped by an Appalachian road stand recently, regular honey works just as well.

It's warmth and friendliness makes this concotion a perfect candidate for a winter holiday treat. After all, the salt of the bacon and the sweet of the date combined with slightly sweet cheese is a perfect little bite, and great for grazing. Because you can make them ahead and they are relatively to churn out assembly line style once you get going, you can make as many as you want. I try to budget 2-3 dates per person. Some will eat more, some will eat less.

Bacon Wrapped Dates with Honey

Ingredients
2 Bacon Packages (thin sliced, about 32 slices) cut in half
2 lbs Medjool Dates (pref. pitted, better if large, and soft)
1 lbs Mascarpone cheese (2 8 oz tubs), at room temperature
1/3 cup Honey (raw honey if available)
      Olive Oil
      Coarse Sea Salt (such as Fleur de Sel)

Cooking time: 1 hour prep, 25 minutes to cook. Makes 64 dates.

Instructions
  1. Mix together softened mascarpone cheese with 1/3 of a cup honey until soft, smooth and creamy.
  2. Add cheese to gallon ziploc bag, placing cheese as close to one corner as possible. Snip the very edge (1/8") of the corner of the ziploc bag to create an impromptu pastry bag. If you have an actual pastry bag, use it.
  3. Slice dates down the center on one side, revealing the center. If necessary, remove the pit. Open the date so the center of the pit is exposed.
  4. Fill center of the dates with cheese. The dates do not have to close all the way and can have some overflow. The warmer the cheese is, the easier it will be to squeeze.
  5. Slice strips of bacon in half. Try to select bacon with minimum fat content on the edges.
  6. Place the date cheese-side down at the end of the strip of bacon and roll. Dates can be stored rolled up until ready to cook. If dates are large, pick dates with a toothpick to ensure that the bacon stays rolled prior to baking.
  7. Cook at 375 degrees for 25 minutes on a wire rack place on top of a cookie sheet.
  8. Serve immediately. If desired, sprinkle with quality olive oil and fleur de sel before serving.

Menu: Christmas Party Menu

Another  year, another holiday party. This is the one party that we have taken to throwing every year, partially as an excuse to buy a Christmas tree. Partially because this time of the year just makes me want to make cookies, cookies, and yet more cookies. Yet again, we were a little insane in the amount of food we prepared, but there are so many things we've started looking forward to as "something we'll do for the holiday party" that it's just hard to stop yourself. We'll be posting recipes as we find the time, recover from our hangovers, and look with horror at the mess we made.

This year, we added a spicy nut mix, homemade liver mousse, and a second vegetarian option of spicy sweet potato (a recipe I made up and am still working on perfecting). We also made pignoli cookies, which I had for the first time during our recent Tuscany trip. I insisted on trying to replicate them. These aren't quite as good as the ones I had in Italy but were an excellent first attempt and stand up on their own. In addition, we had our old favorites. You just can't go wrong with this beef recipe, or with bacon wrapped dates that matter. There's bacon. There's date. It's perfect.


So enjoy, and have a happy holiday season!


Appetizers -
Chicken "Faux Gras" Mousse with Cucumber Gelee
Truffle Butter Popcorn
Pistachio and Cranberry Stuffed Brie with Raw Honey

Main Courses -
Spanakopita Triangles (Vegetarian) We made these smaller than the dinner-sized portions we usually make. Just cut the phyllo six ways horizontally instead of in half vertically.
Chipotle Sweet Potato Pockets (Vegetarian)
Ginger and Vodka Cured Beef Tenderloin

Cookies -
Molasses Crinkles
Holiday Rice Krispie Treats

Beverages -
Mulled Wine
Egg Nog

Sunday, November 20, 2011

Pumpkin Spice Bread

This is part of our Christmas tradition in my household, and the making of it surrounding both Thanksgiving and Christmas is very serious business indeed, lest you forget the flour or the baking soda. (Both have been done by various daughters). Most pumpkin breads are super dense and saccarin sweet. This one, while still sweet and still moist, tries to be just a little more bread-like rather than cake-like. 

This recipe is originally called Jenean's Pumpkin Bread, and comes from a falling apart 70s era cookbook of recipes from our hometown in Virginia. However, we might have adapted Jenean's recipe a bit, reducing the amount of sugar and oil and doubling all of the spices, so really, it is just the family recipe now. For those of you who are health nuts, there is a healthier version of this recipe using applesauce that my sister has created, but this is the original version that does not take the health of one's father into account at all, knowing that said father will probably consume at least half of one loaf single-handedly over a forty eight hour period.

Because we make this in bulk every holiday, we often end up freezing a loaf or two for later by wrapping tightly in foil. It will keep for about a month in the freezer. You can also prepare the dry ingredients ahead of time to make a sort of bread mix for later, keeping in mind that for baking purposes, sugar is a wet ingredient. Serves perfectly topped with butter.


Pumpkin Spice Bread

Ingredients
2 cups sugar
1 cup salad oil
2 cups pumpkin (1 15 oz can)
4 eggs
3 cups flour
1/2 tsp salt
1/2 tsp baking powder
2 tsp cloves
2 tsp nutmeg
2 tsp cinnamon
1 tsp baking soda


Instructions

1. Grease inside of loaf pans with butter or butter wrapper. Be sure to be thorough. 
2. Blend sugar and salad oil together with hand mixer in large bowl. 
3. Add eggs and pumpkin. 
4. Sift dry ingredients together in separate bowl (flour, cloves, nutmeg, cinnamon, baking soda, baking powder, and salt) and add to pumpkin blend.
5. Mix together until well combined. Pour mixture evenly into two loaf pans.
6. Bake at 350 degrees for 1 hour 15 minutes.
7. Let cool for 30 minutes in pan, then remove and allow to finish cooling on wire racks.


Tuesday, October 25, 2011

Guiness Cupcakes with Bailey's Frosting (Car Bomb Cupcakes)

UPDATE- So I updated this recipe a bit when I made a Guiness Cake this year for St. Patrick's Day. The cake recipe is a bit denser than this recipe, relying on baking powder more than baking soda to rise and with a little more chocolate. I also made the chocolate whiskey frosting.

Guiness cake is delicious. It can be made with any chocolate or dark stout beer, such as Duck Rabbit Milk Stout. There seem to be two main recipes for it online, Nigella Lawson's and the Great Barrington Brewery recipe. I have made both. These cupcakes I choose Nigella Lawson's, adapted it for cupcakes, and increased the darkness to it by adding a 1/4 cup of coffee in addition to the Guiness. However, while the recipe calls for a cream cheese frosting, I used the Bailey's Irish Cream Butter Cream recipe found on Smitten Kitchen. If you are asking, why did you not ALSO do the Chocolate Whiskey Ganache on Smitten Kitchen to truly make it a car bomb cupcake? The answer is two-fold. First, I didn't have a tiny baking round at my disposal, as this was made at my sister's house for my brother-in-law's birthday. Secondly, this cake is very rich and the Bailey's frosting is over the top and alcoholic as is. Last time I made the full-sized cake (using the Great Barrington recipe plus a little extra chocolate), I accused it (the cake) of getting me drunk. That might have been an unfair accusation given the wine consumed at that dinner party prior to the cake's arrival on the scene, but the point is the same. There's alcohol in the Bailey's and I think that's enough and that the whiskey ganache is unnecessary.

Unlike the Irish Cream, the Guiness alcohol does cook fully off, so if you want to serve this to kids, just do a basic cream cheese frosting instead. When I make this for St. Patrick's Day, I only top the top of the cake, making it look like a glass of Guiness with the foam on top. 

The superfine sugar is always nice to use in baking. If you don't have it, you can just use regular sugar, or if you are feeling fancy, run 2 cups of regular sugar through a food processor for a minute, creating a finer sugar. Remember that making frosting is not an exact science (unlike most else things in baking, so enjoy it). It will look wrong, then right, then wrong again. The trick is to add the powdered sugar in batches at a time to the creamed butter. This not only prevents a mess of powdered sugar everywhere, but also tends to require less sugar to hit your desired fluffy and delicious consistency.


Guiness Cupcakes with Bailey's Irish Cream Frosting (Car Bomb Cupcakes)

Guiness Cake:
Paper or Aluminum  muffin or cupcake wrappers
1 cup Guinness stout + 2 tablespoons
10 tablespoons (1 stick plus 2 tablespoons) unsalted butter
3/8 cup unsweetened dutch processed cocoa powder
1/4 cup cold coffee and/or 1 tsp espresso powder (both optional)
2 cups superfine sugar (I have used regular granulated sugar with no ill effects)
3/8 cup sour cream
2 extra-large eggs
1 tablespoon vanilla extract
2 cups all-purpose flour
2 1/2 teaspoons baking soda

Bailey's Frosting:
3 to 4 cups confections sugar
1 stick (1/2 cup or 4 ounces) unsalted butter, at room temperatue
3 to 4 tablespoons Baileys - 1 airplane bottle's worth
Additional milk or cream for blending if necessary


Instructions
For the Cupcakes
  1. Heat oven to 350 degrees. 
  2. Line muffin tins with foil or paper liners
  3. In a large saucepan, combine Guinness and butter. Place over medium-low heat until butter JUST melts, then remove from heat into medium sized bowl. 
  4. Add cocoa and superfine sugar, and whisk to blend.
  5. Meanwhile, in a small bowl, combine sour cream, eggs and vanilla; mix well. 
  6. Add sour cream and egg mixture to Guinness mixture.
  7. Add coffee and espresso powder if using.
  8. Add flour and baking soda, and whisk again until smooth. 
  9. Pour into muffin tins, filling about 3/4 of the way, and bake until risen and a toothpick inserted in the center comes out clean, 17 to 20 minutes, rotating once for even baking. This may slightly deflate the cupcakes, so it might be good to have an official "tester" cupcake.
  10. Leave in muffin tins for five minutes then remove to a wire rack to finish cooling. Do not frost until completely cool.

For the Frosting
  1. Whip the butter in the bowl of an electric mixer, or with a hand mixer, for several minutes. You want to get it very light and fluffy. Slowly add the powdered sugar, a few tablespoons at a time.
  2. When the frosting looks thick enough to spread or thicker, drizzle in the Baileys (or milk if you are doing the non-alcoholic option) and whip it until combined and frosting is correct texture. 
  3. If this has made the frosting too thin (it shouldn’t, but just in case) beat in another spoonful or two of powdered sugar.
  4. Frost the top of the cupcakes and serve. Store in a covered container in the fridge. They should keep for at least a day before starting to go stale.

Wednesday, October 5, 2011

Cilantro Pesto

This pesto is one of the very first things I learned to cook, and will always hold a warm place in my heart because of that. I liked this recipe so much, I bought Robin Miller's cookbook. Of course, I've since added sun dried tomatoes, extra olive oil, a little more garlic, and pepper. But all good recipes get adjusted as they age.

In addition to being a quick and easy dinner option (over chicken, pasta, or even peas. Basically anything you would put pesto on), this recipe is neat because you can freeze the leftover pesto (this recipe is the double batch of the original recipe, as I always make enough to freeze when I make it) in an ice cube tray and take out individual ice cubes each time you want to use it. Put the ice cubes in a rammekin, and leave them next to the flame on the stove while you heat water to boil. It'll thaw by the time the pasta is done. Just one ice cube per person.

My favorite pasta to make this with is three cheese tortellini, but any will work. The original recipe is for chicken. Be sure and be generous with fresh grated Parmesan cheese when you serve. You can add a little parmesan to the pesto if you want, but it works better to just be generous when serving.

A note on the garlic: this recipe is designed to have a rather strong garlic taste when it is finished. This is because when I freeze the pesto, it is less garlicky when thawed. I, for one, am sorta a nut for garlic, so this really doesn't bother me, but if you are not a raw garlic person, either add two fewer cloves of garlic or freeze and thaw before use.

Cilantro Pesto

2 bunches cilantro (about 2 cups)
1/2 cup plus two tablespoons sour cream
1/4 cup sun dried tomatoes
6 tablespoon toasted pine nuts
8 large cloves garlic
1/4 to 1/3 cup extra virgin olive oil
1 1/2 teaspoon freshly ground pepper
1/2 teaspoon sea salt
1/8 teaspoon cayenne


Instructions
  1. Place the pine nuts in a small dry skillet and set over medium heat. 
  2. Toast the nuts until golden brown, about 3 minutes, shaking the pan frequently to prevent burning. Allow to cool to avoid wilting the lettuce. 
  3. Add cilantro, sun dried tomatoes, sour cream, garlic, salt, and pepper to a blender or food processor. 
  4. Add the cooled pine nuts.
  5. Pulse to combine. 
  6. Slowly add olive oil to running blender.
  7. Process and blend until smooth and thick. If necessary, add more sour cream or olive oil to taste. You may need to check to make sure pine nuts have not stuck to the bottom of the blender.
  8. Season with cayenne to taste. 
  9. Pour over pasta to serve. Use prudence when using, pesto is strong stuff.
  10. If freezing, portion out immediately into an empty ice cube tray or two as necessary. Thaw individual ice cubes when ready to use later.

Saturday, September 24, 2011

Spanakopita Triangles


I know everyone says that spanakopita is an obvious answer to the "what to serve vegetarians" question. Or in my particular case the "what to feed vegetarians who don't for some crazy unknown reason love mushrooms"? But this spanakopita has a ton of flavor, some unconventional pine nuts, and the pepper on top that really make this recipe. Plus, this recipe was my introduction to phyllo, which gave me confidence to try other things phyllo and thus unlock a whole new world of cooking. Adding the bread crumbs really does help prevent the sheets from sticking together as you assemble them.

This recipe can be a little time intensive. Layering out all that phyllo and rolling the triangles takes time. The benefit of it, however, is that as long as you're doing phyllo, you can do a lot, and it freezes quite well. I almost always make at least a double recipe and save the leftovers. When it's a weekday and TK and I have both worked late but frankly don't want the grease of delivery, there's delicious homemade spanakopita. You don't even have to thaw them, in fact, you don't want to thaw them at all, as that would make the phyllo soggy when cooked. Pop them straight from the freezer to a cookie sheet, top with melted butter, salt, and pepper, and cook.

Two triangles make a meal. One makes a solid side or first course. If you want appetizer-sized triangles, Cut horizontally six ways instead of vertically halfways and use a tablespoon instead of a 1/4 cup measure. The smaller triangles will be more delicate but can likewise be frozen. There will be plenty of filling for all the phyllo you desire. One box per batch. Try your feta before you add it. You may have to adjust the salt content of the dish based on how salty your feta is. We like to serve with a quick dipping sauce of yogurt, cucumber, lemon juice and pepper.


Ingredients

 
1/4 cup good olive oil
1 cup chopped yellow onion
3 scallions, white and green parts, chopped
2 (10-ounce) packages frozen chopped spinach, defrosted
4 extra-large eggs, lightly beaten
3 tablespoons freshly grated Parmesan cheese
Plain dry bread crumbs (not seasoned or panko)
1 teaspoon grated nutmeg
2 teaspoons kosher salt
1 teaspoon freshly ground black pepper
2 cups small-diced feta cheese (12 ounces)
3 tablespoons toasted pine nuts
24 sheets frozen phyllo dough, defrosted
1/4 pound (1 stick) unsalted butter, melted
Flaked sea salt, such as Maldon, for sprinkling

Directions

  1. Thaw frozen spinach in strainer until no ice remains.
  2. Preheat the oven to 375 degrees F.
  3. Heat the olive oil in a medium saute pan, add the onion, and cook for 5 minutes over medium-low heat. Add the scallions, and cook for another 2 minutes until the scallions are wilted but still green. 
  4. Meanwhile, gently squeeze the water out of the spinach and place in a large bowl.
  5. When the onion and scallions are done, add them to the spinach. Mix in the eggs, Parmesan cheese, 3 tablespoons bread crumbs, the nutmeg (use a rasp to grate if you have fresh nutmeg), salt, and pepper. Gently fold in the feta and pine nuts.
  6. Place 1 sheet of phyllo dough flat on a work surface with the long end in front of you. Brush the dough lightly with butter and sprinkle it with a teaspoon of bread crumbs.
  7. Working quickly, slide another sheet of phyllo dough on top of the first, brush it with butter, and sprinkle lightly with bread crumbs. (Use just enough bread crumbs so the layers of phyllo don't stick together.) Pile 4 layers total on top of each other this way, brushing each with butter and sprinkling with bread crumbs. 
  8. Cut the sheets of phyllo in half lengthwise. 
  9. Place 1/3 cup spinach filling in the bottom right corner of the strips of phyllo. If necessary, shape the filling to make sure it fills the corners of the triangle you are about to form. Fold the phyllo over the filling diagonally like you are folding a flag (see video). Then fold the triangle of phyllo over straight and then diagonally again. Continue folding first diagonally and then straight until you reach the end of the sheet and the filling is enclosed in the phyllo.
  10. Continue assembling phyllo layers and folding the filling until all of the filling is used or you run out of phyllo. If you are planning on serving later, freeze the folded phyllo triangles in a tupperware containern neatly stacked until you are ready to cook, then continue on with the directions, placing the frozen unthawed triangles on the sheet pan.
  11. Place on a sheet pan, seam sides down. Brush with melted butter, sprinkle with flaked salt, and bake for 30 to 35 minutes, until the phyllo is browned and crisp. Serve hot. 

Sunday, August 28, 2011

Mocha Ice Box Cake (Cookie Cake)

I saw Barefoot Contessa make this cake on her show, and I thought, okay, this is so over-the-top crazy and rich, it just has to be good. Otherwise, how did it get green-lighted? The answer is that this is both completely unexpected and exactly what you think it is going to be. That is, an almost tiramisu like "cake" where chocolate chip cookies replace the lady fingers. The cookies absorb the whip cream and coffee liqueur while the chips remain for welcome chunks of chocolate. This is a diet killer, but if you're going off the diet, go big.

The recipe hinges on choice of cookie. While I make a pretty mean chewy chocolate chip cookie, its fraternal twin the crispy chocolate chip cookie is not something I've mastered. Plus, since the general ease of making this dish is part of its appeal, do you really want to have to make a whole other dessert just to start this recipe? So, the goal should be to score some crispy, thin (absorbant) cookies from the grocer's bakery or the food aisle if you can find it. I realize this can be a little hard to find (we get Otterbein's Chocolate Chip, which they sell at Giant and Calvert Woodley. Tate's cookies or Anna's Ginger Snaps, etc. are also good options). Ginger snaps are a nice variation from the chocolate chip version.

The mocha whipped cream is a rich and complex cream, and is a sneaky little tool to keep in your whip cream arsenal to drop on anything chocolate and sweet as a finisher. Brownie? Dab a little mocha whip cream on that. The shaved chocolate, which seems like a gratuitous thing, actually is more than garnish and really does add a distinct flavor profile to the cake. It's good without the shavings, but the dish tastes way more complete with them on. Again, the tiramisu comparison invites itself and is appropriate here. Before you know it, this recipe will be in your standards list of a quick and easy way to celebrate a special occasion in a classy yet comforting way.


Mocha Ice Box Cake (Cookie Cake)


2 cups cold heavy cream
12 ounces Italian mascarpone cheese
1/2 cup sugar
1/4 cup coffee liqueur, such as Kahlua
2 tablespoons unsweetened cocoa powder, such as Pernigotti
1 teaspoon instant espresso powder
1 teaspoon pure vanilla extract
3 (8-ounce) packages chocolate chip cookies, such as Tate's Bake Shop
Shaved semisweet chocolate, for garnish


Instructions
  1. Using either a hand mixer or standing mixer with a whisk attachment, combine the heavy cream, mascarpone, sugar, coffee liqueur, cocoa powder, espresso powder, and vanilla. Mix on low speed to combine and then slowly raise the speed, until it forms firm peaks (when the whisk is lifted out of the cream the cream remains stiff at the end of the attachment).
  2. To assemble the cake, arrange chocolate chip cookies flat in an 8-inch springform pan, covering the bottom as much as possible like a puzzle. (I break some cookies to fill in the spaces.) Spread a fifth of the mocha whipped cream evenly over the cookies. 
  3. Place another layer of cookies on top, lying flat and touching, followed by another fifth of the cream.
  4. Continue layering cookies and cream until there are 5 layers of each and you've hit the top of the spring form pan, ending with a layer of cream.
  5. Smooth the top, cover with plastic wrap, and refrigerate overnight.
  6. Run a small sharp knife around the outside of the cake and remove the sides of the pan. 
  7. Using a fine grater or rasp, grate thin shaving of chocolate on the top of cake. Cut in wedges, and serve cold. 


Cooking Time: 12 hours Inactive, 30 minutes active

Monday, August 22, 2011

Chilled Cucumber-Avocado Soup with Crab Salad

I love cold soups, especially cold cucumber soup.  It reminds me of hot midday meals in the Caribbean and Mexico.  Of course, eating it at home is pretty good, too.

When I make this dish for guests I want it to transport them the same way it transports me, so I add lots of flavor.  The addition of avocado and coconut milk to pureed cucumber makes the soup creamy-smooth, and adds a pleasant sweetness.  I cut through that sweetness with just enough Thai green curry paste and serrano chile to linger on your palette.  The crab salad, which can be omitted for a vegetarian friendly plate, adds a luxurious element to the dish and compliments the flavors in the soup perfectly.

The soup is best eaten the day after it’s made to give the flavors time to develop.  If your blender is too small to accommodate all of the ingredients (remember to factor the water into your calculation), blend the soup in batches.  It’s worth splurging for jumbo lump crabmeat for this recipe.  The crab is dressed simply, so the relative quality of your product will really show though.

Chilled Cucumber-Avocado Soup with Crab Salad

Ingredients

Cucumber Avocado Soup
2 cucumbers, about 12 ounces each, peeled, seeded and coarsely chopped
2 Hass avocados, coarsely chopped
3 teaspoons Thai green curry paste
2 teaspoons sugar
3 teaspoons finely grated lime zest from 3 limes
2 serrano chiles, seeded and chopped
1 13-ounce can unsweetened coconut milk
3 tablespoons lime juice from 3 limes
Fine sea salt
Cayenne pepper
Ground white pepper
Siracha (optional)

Crab Salad (Optional)
1 pound jumbo lump crab meat, picked over
2-3 tablespoons lemon juice from 1 lemon
1 tablespoon minced chives
Black pepper


How to Pit An Avocado

Instructions

  1. In a blender, puree the cucumbers until smooth.  Add the avocados, curry paste, sugar, lime zest and chile.  Process until blended.  Add 3 1/2 cups of water, the coconut milk and lime juice and process until smooth.  Transfer the soup to a large bowl and season with salt, cayenne and white pepper to taste.  Cover and refrigerate until chilled, or overnight.
  2. When ready to serve the soup, place the crabmeat in a medium bowl and add the lemon juice and chives.  Toss gently to combine.  Season with salt, black pepper and cayenne to taste. 
  3. Taste and season the now developed flavors of the soup with salt, white pepper, and drops of siracha for added heat (optional--be gentle).
  4. To serve, mound a small pile of the crab salad in the center of a wide soup bowl.  Carefully ladle some of the soup around the crab.  The crab should still be visible above the soup.  Don’t’ submerge it.  Repeat with remaining bowls.  Finish the soup with a drizzle of olive oil and a pinch of freshly ground black pepper.