Friday, January 20, 2012

Pasta With Kalamata Olives, Garlic and Basil

This is a pretty easy way to take a simple pasta dish and make it complex and deeply layered. The acid of the tomato paste, brightness of the lemon, salt of the anchovy paste (or olive paste if preparing as vegetarian/no anchovy version), and fresh herb of the basil create flavors all around. It's a warm, flavorful meal that isn't half bad for lunch the next day, either.

To make the recipe vegetarian, just substitute kalamata olive paste for the anchovies/anchovy paste. You can also do this if you are simply scared of the anchovy, as many people are. I encourage you, however, not to fear these salty, oily fish, but embrace it. The easiest way to think of anchovy is as the X factor in a lot of things, such as this dish, or Ceasar salad. You can't fully taste it, but it adds a brine-y note that is distinct and often what people love about these dishes. Admittedly, it can be a mess to work with straight from the jar (always get the white filets). It's oily. That's why we often substitute in a little bit of anchovy paste in place of the filets to save time and clean-up. The filets are better, but so is not cleaning an extra knife and cutting board and figuring out what to do with the rest of the jar of anchovies. Like with tomato paste, we buy the tubes of anchovy paste, and keep the leftovers in the fridge for later. This way we don't feel wasteful buying a whole can of tomato paste and then only using a tablespoon. How many recipes really call for a whole can of tomato paste, anyway?

If you find the salt of kalamata olives is too strong, you can use Manzilla olives in their place. The original recipe for this had bread crumbs to thicken, but we've never really had a problem with the sauce being runny, so we've removed them, though we have continued to use the full amount of garlic. Basil can be expensive, and you can reduce it as low as half a cup if necessary.


Cooking Time: 40 minutes, Serves 4


Ingredients

1/4       cup extra-virgin olive oil
6          medium garlic cloves, minced or pressed through garlic press (about 2 tablespoons)
1          tablespoon minced white anchovy fillets (4 to 6 fillets)  
           OR 1 teaspoon of anchovy paste 
           OR 1 teaspoon kalamata olive paste (if vegetarian)
1          tablespoon tomato paste
1/4-1/2 teaspoon hot red pepper flakes
1/4        cup oil-packed sun-dried tomatoes , drained, rinsed, patted dry, and cut into thin strips
1           cup pitted kalmata olives , well rinsed and coarsely chopped (1 8 oz bottle)
1 3/4     teaspoons table salt
1           pound rigatoni (mezze) or farfalle (any short pasta will work)
2           ounces finely grated Parmesan cheese (about 1 cup)
3           tablespoons chopped fresh parsley leaves
1 1/2     cups lightly packed fresh basil leaves , roughly torn
            Ground black pepper
1           lemon , cut into wedges


Instructions

  1. Combine 2 tablespoons quality olive oil, garlic, anchovies (or paste of choice if substituting), tomato paste, red pepper flakes, sun-dried tomatoes, and olives in medium bowl. Make sure olives are well-rinsed of brine prior to chopping and adding. Set aside.
  2. Meanwhile, bring 4 quarts water to boil in Dutch oven over high heat. Add rigatoni and salt.
  3. While pasta is cooking, heat 12" nonstick skillet to medium heat and add olive mixture and remaining olive oil. Cook until olive mixture is aromatic and oil has turned rusty red, 4 to 6 minutes. 
  4. Remove 1 cup pasta cooking water from pot and add to skillet. Bring to simmer and cook for 2 minutes. Remove pan from heat while pasta finishes cooking.
  5. When pasta is just shy of al dente, drain pasta, reserving 1/2 cup of pasta cooking water, and transfer back to Dutch oven. 
  6. Add olive mixture to pasta and toss over medium heat until pasta absorbs most of liquid, about 2 minutes. Stir in 1/2 cup Parmesan. Adjust consistency of sauce with reserved pasta water. (Sauce should cling to pasta but not be too loose or runny.) 
  7. Remove pot from heat and stir in parsley and basil; adjust seasoning with pepper. 
  8. Sprinkle with parmesan and serve with lemon wedges to be added prior to eating.

Saturday, January 7, 2012

Peppermint Mocha Cookies

These cookies are almost like a tiny little brownie topped with peppermint butter cream. I make them every year for Christmas as my official "festive" cookie. They're a bit more unusual than your standard sugar cookie or gingerbread cookie, but feel right at home among their more traditional holiday brethren, and round out any good cookie exchange with a rich chocolate option. And if you want them outside the month of December, just omit the food coloring, or go with red or blue instead of the admittedly Christmas driven green. They're not that hard to make. They look adorable, and you get to play around with a mallet. Who doesn't want to play with a mallet?

Speaking of which, when crushing your candy canes, try and really crush them down into a fine crumb of candy cane. You want the cookies to have a bit of texture and crunch, but not have such large pieces that they get caught in your teeth while eating. The color of the candy cane will still be evident against the butter cream backdrop. Make sure to ice then top immediately, instead of icing a large number then going back to top with candies. The frosting will start to harden very quickly, and once that happens, the peppermint won't stick. It is easiest to just got frost, top, plate. Frost. Top. Plate. If pressed for time, the cookies can be made the day before you frost. Store in an air-tight plastic container along with a slice of torn up sandwich bread. The sandwich bread prevents the cookies from drying out and keeps the chew. They may stick together very slightly when stacked. This is fine. Remember, you are frosting the cookies, so small blemishes on the top will be washed a way in a delicious layer of mint frosting. Frosting covers all. Be generous with the frosting. It's meant to be a thick, almost cake-like layer of frosting.

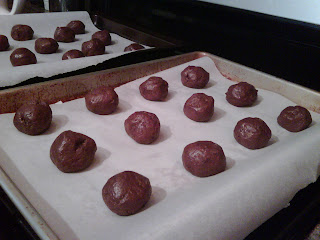
The cookies will not spread very much in the oven. They are meant to be about the size of a silver dollar.

Cooking Time: 30 minutes active, 30 minutes inactive Makes 24-30 small cookies

Ingredients

Cookies
1 3/4 cups
all-purpose flour
1/2   cup
cocoa powder
1/2   teaspoon
baking soda
1/2   teaspoon
table salt
8      tablespoons
unsalted butter (1 stick), softened but still cool
3/4   cup
granulated sugar
1/2   cup
brewed espresso or strong coffee, cooled
1/2   teaspoon espresso powder (optional)
1      teaspoon
vanilla extract

Frosting
6     tablespoons
unsalted butter , softened
2     cups
confectioners' sugar
2     tablespoons
milk
1/2 to 3/4 teaspoon
peppermint extract (or to taste)
3 to 4 drops green or red food coloring 
4      peppermint candy canes (or about 10-12 peppermint wheels), crushed into crumbs

Instructions


  1. For the cookies: Adjust oven racks to upper-middle and lower-middle positions and heat oven to 350 degrees. Line 2 large (18 by 12-inch) baking sheets with parchment paper.
  2. Sift flour, cocoa, baking soda, and salt together into medium bowl.
  3. In a separate bowl, beat butter and sugar with an electric mixer at medium speed until light and fluffy, about 5 minutes. Scrape down sides of bowl with rubber spatula.
  4. Dissolve espresso powder into cold coffee. (If coffee is warm, dissolve espresso powder, then place measuring cup of coffee in a larger measuring cup serving as an ice water bath to cool quickly.
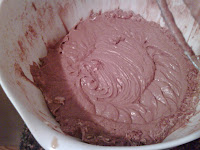
  5. Add cooled espresso and vanilla and beat at medium-low speed until combined. Don't worry if it looks curdled, that will fix itself when you add the dry ingredients. Scrape down bowl.
  6. Don't worry, it'll work itself out.
    It may curdle when coffee is added
  7. With mixer on low speed, gradually add dry ingredients and mix until just combined.
  8. Roll dough into thirty 1-inch balls. Place 15 balls on each prepared baking sheet, spacing them about 2 inches apart. 
  9. Bake until just set, rotating sheets from front to back and top to bottom halfway through baking, 8 to 11 minutes. 
  10. Cool cookies on sheets for 2 minutes; transfer with metal spatula to wire rack to cool completely, at least 30 minutes. (Cookies can be stored in airtight container with a torn piece of sandwich bread or a couple of sugar cubes for up to 4 days.)
  11. For the frosting: Take the candy canes, and place inside a gallon ziploc bag. Seal the bag tightly, then place on a cutting board and strike with the smooth, wide side of a mallet until the candy canes become a fine powder. Set aside while you make the frosting.
  12. With an electric mixer, beat butter at medium-high speed until smooth, about 1 minute. 
  13. With mixer running, add confectioners' sugar a 1/4 cup at a time and beat at medium-low speed until most of the sugar is moistened, about 45 seconds. 
  14. Scrape down bowl and beat at medium speed until mixture is fully combined and starting to cream, about 3 minutes. Scrape down bowl.
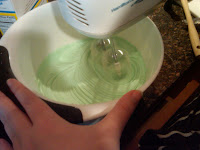
  15. Add milk, peppermint extract, and food coloring and beat at medium speed until incorporated, about 10 seconds, then increase speed to medium-high and beat until light and fluffy, about 4 minutes, scraping down bowl once or twice. 
  16. Frost a cooled cookie with a rubber spatula or angled spatula and immediately sprinkle with crushed mints. Place on a plate for the frosting to harden, and continue frosting the rest of the cookies. (Once frosted, cookies are best served within 3 days.)


Sunday, January 1, 2012

Brown Sugar and Citrus Cured Salmon

This salmon has become a staple at our holiday party and is always one of the first things to get eaten. It makes an elegant and impressive hors d'oeuvre, but it's simple to make and can be prepared days ahead of time and sliced just before the party.

The salmon can cure for anywhere from 24 to 48 hours. I prefer lightly-cured salmon, which is melt-in-your-mouth tender and still has prominent salmon flavor, so I only cure my salmon for 24 hours. If you prefer your cured salmon to have firmer flesh and saltier flavor, leave your fish in the cure for the full 48 hours. If you're squeamish about serving raw-ish fish to your guests, I would recommend curing your fish for longer than 24 hours.

This recipe will work well with any variety of salmon, but it has to be very fresh. Ask your fishmonger which salmon is the freshest, and choose that one. Try to begin curing the salmon on the same day you purchase your fish. This recipe will make enough fish to serve 6 as an appetizer. For larger parties, simply use a larger filet and increase the amount of curing mixture to maintain the correct ratio of fish to cure.

Ingredients 
1 pound very fresh salmon filet, skin on
1 cup Kosher salt
1 cup dark brown sugar
1 tablespoon black peppercorns
1/4 cup citrus zest from any combination of lemons, limes, oranges and grapefruits
several sprigs dill
creme fraiche


Instructions
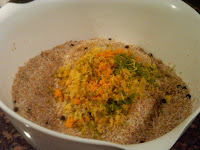
  1. Combine the salt, sugar, peppercorns and zest in a medium bowl.
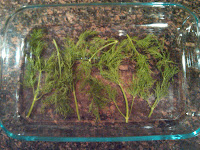
  2. Line the bottom of a glass baking dish with the dill. Pour a third of the curing mixture over the dill and smooth.
  3. Place the salmon, skin down, into the dish and pour the rest of the curing mixture over the fish. Smooth the curing mixture to form an even layer. The salmon should be completely encased in the curing mixture.
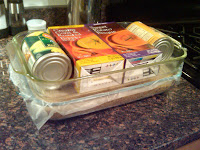
  4. Place a layer of plastic wrap directly onto the curing mixture, and place another glass baking dish on top of that. Weight with cans and place in the refrigerator for 24 to 48 hours.
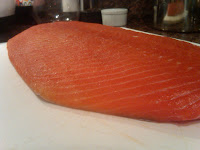
  5. Remove the salmon from the curing mixture and rinse thoroughly under running water. Dry the salmon with paper towels and remove the skin using a filet knife. Slice as thinly as possible and serve with creme fraiche.