Wednesday, January 28, 2015

Whole Maine Lobster

Every year, TK and I go up to the Berkshires for New Years. Over the years, we have tried going out on New Year's Eve with mixed results. In the end, we've settled that the best plan is to not leave the Lakehouse at all if possible. Instead, we do lobster. When in New England, we figure, we are pretty much obligated to procure fantastic local lobsters, which we serve with haricot verts and potato gratin. This differs from our Summer lobster meal, when we serve our lobster with corn on the cobb and jalepeno cheddar biscuits. It is something I look forward to all year, and a great way to kick off the New Year. You just can't go wrong with a perfect whole lobster, boiled in salt water and served with butter and lemon. When your base ingredients are that good, the best thing to do is to let them speak for themselves, serve them simply, and enjoy.

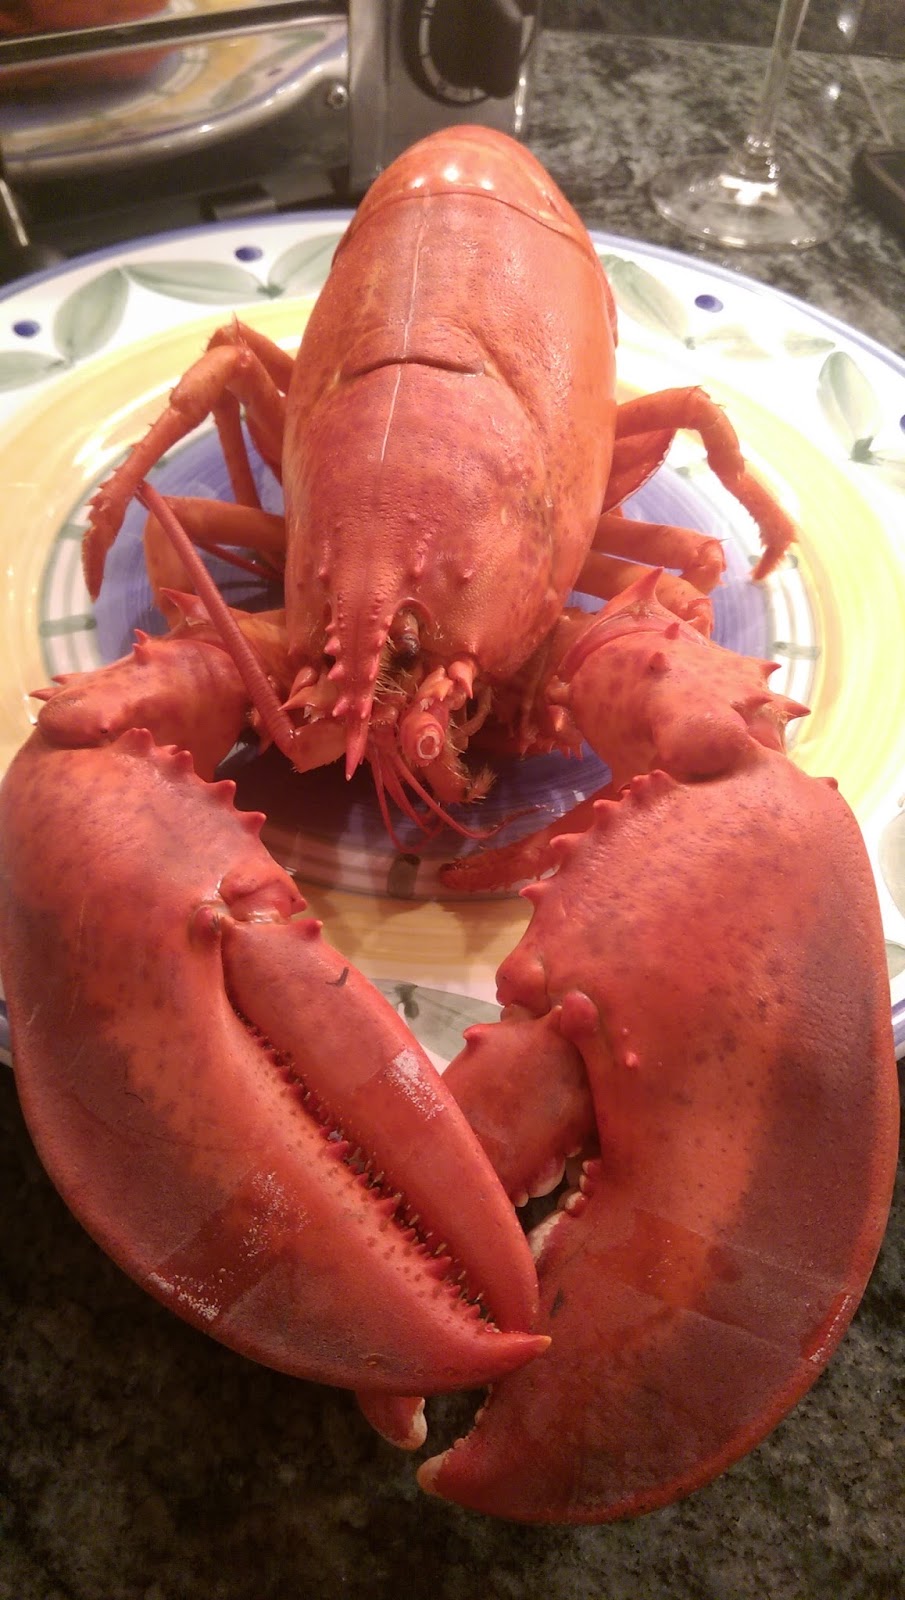
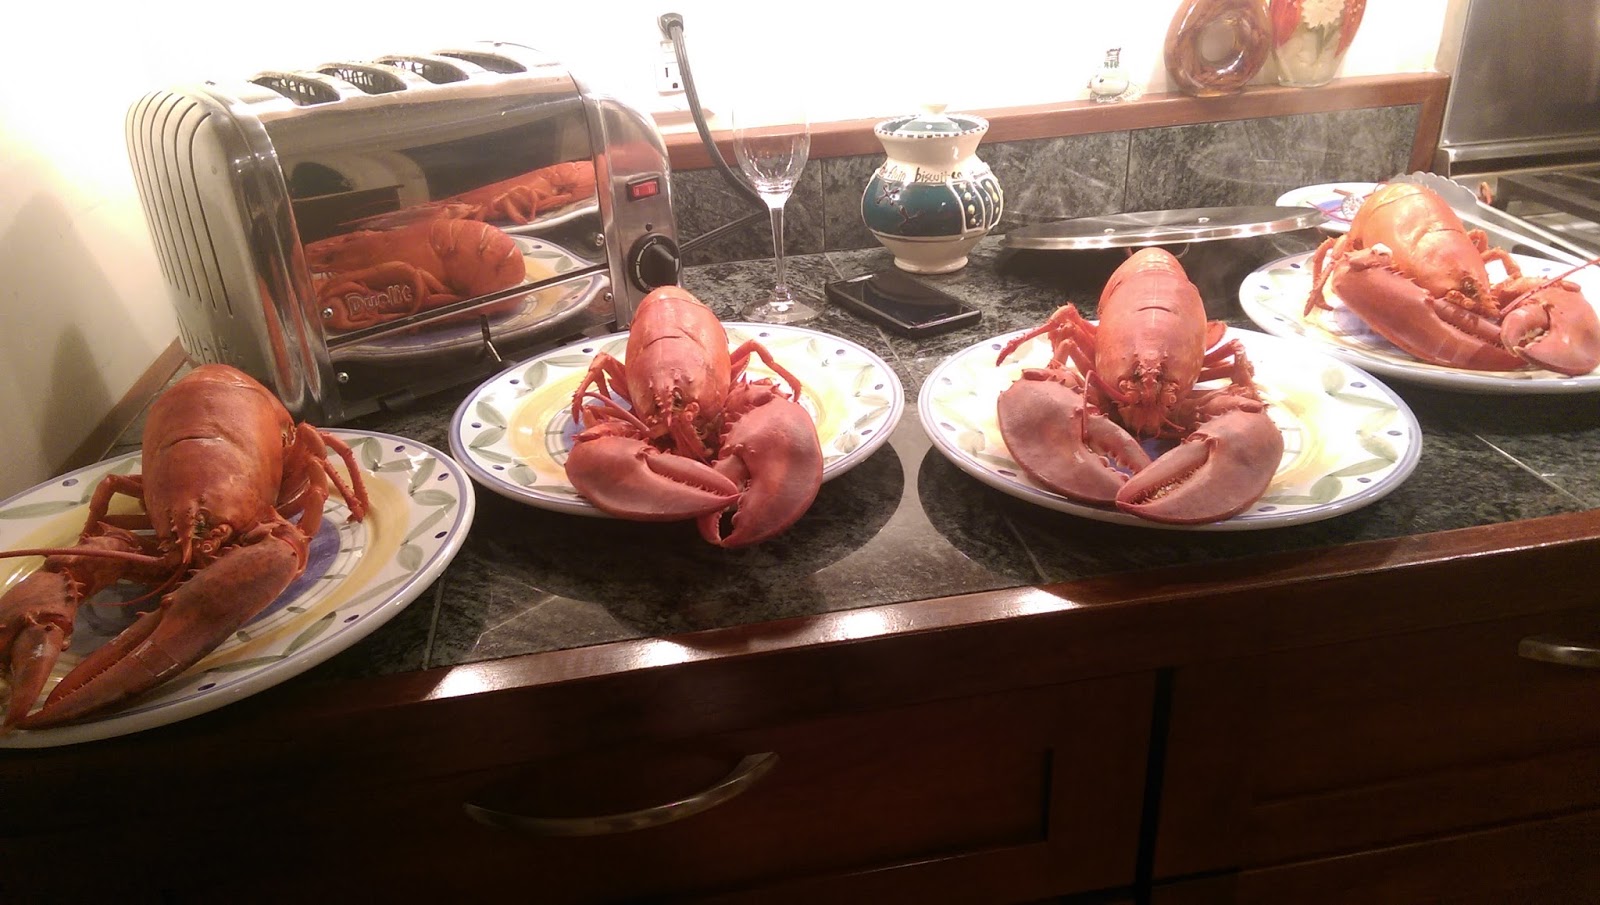
Our preferred size lobster is between 1.5 lbs and 2 lbs (or to be entirely accurate, however much over 1.5 lbs the seafood salesman will give us before charging us the 2 lbs. lobster rate). Larger lobsters do not automatically mean better meat. The real 20 lbs. giants that they raffle off  in stores actually tend to have tougher meat. Lobsters shed their shells, and at certain parts of the years their shells are softer and thinner than others. These soft-shelled lobsters are significantly easier to crack, barely needing the cracker at times. Still, the softer the shell is, the newer it is, and the more room to grow the lobster has. This means the lobster will have more water weight and less meat inside, so you might want to consider a slightly larger lobster. These particular lobsters were the more common hard-shells.

The generally most anticipated part of having lobster is the killing of the lobster. Now, I think of lobsters as mutant sea bugs, so I have very little pity for them. But no one wants to make anyone suffer. We like to sedate the lobsters a little bit. We store them with wet paper towels on top in the fridge before we're ready, and then remove them one at a time and drop them in the pot. Sometimes, the fridge will be enough to make them mellow, but for particularly feisty lobsters, we put them in the freezer for about half an hour or less to sedate them. We try to minimize the time between when they are out of the fridge and when they are in the water. We submerge them completely, and feel that that is more humane than dragging it out by knifing them in the skull beforehand, though some do choose to do so.

Boiled Whole Maine Lobsters

lobsters
sea salt
butter (1/4 cup per lobster)
lemon juice (1/2 lemon per lobster)


Boiling Time For Lobsters:
1 lbs lobsters: 8-10 minutes
1.5 lbs lobsters: 12-15 minutes
2 lbs lobsters: 15-18 minutes


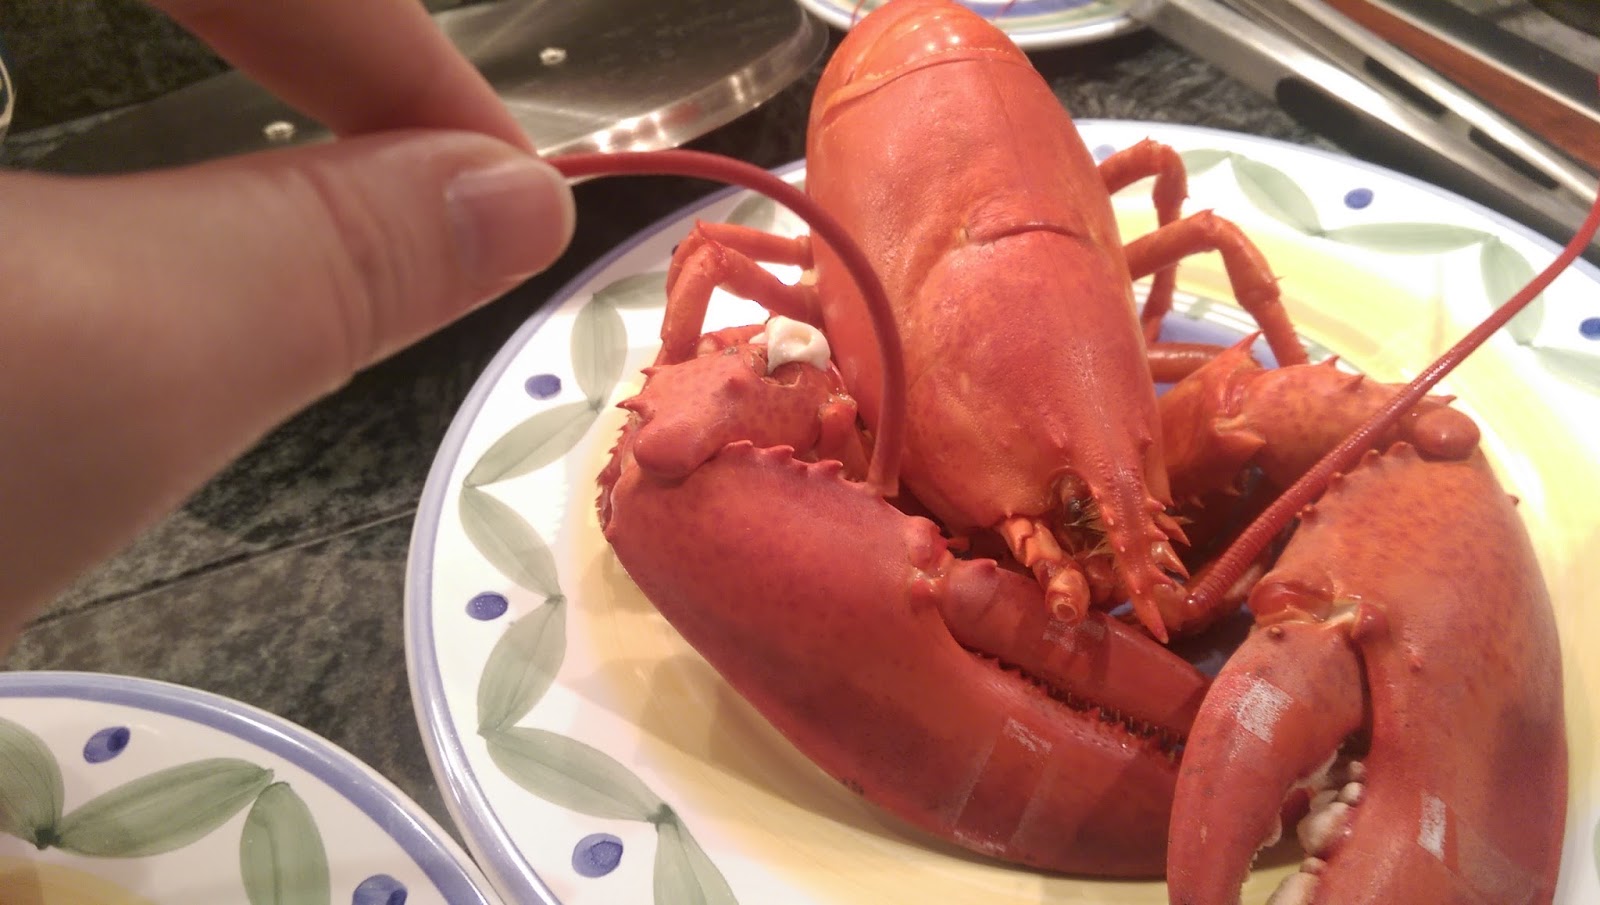
When you can pop the antennae off, your lobster is done.
  1. In the largest pot you can find with a tight-fitting lid, add 3 quarts of water for each lobster you want to boil, filling the pot about 2/3rd to 3/4 of the way full.
  2. Add generous amounts of sea salt (approx. 3 tablespoons per quart) to water and bring to a healthy boil. You are trying to mimic seawater.
  3. Remove your lobsters from the fridge one at a time and quickly dunk them head first into the boiling water. Make sure to remove the rubber bands before dropping them in the water as the rubber in the bands can actually change the taste of the boiling liquid. Don't worry, and don't drag it out. The lobster won't get you.
  4. Boil your lobsters for the necessary time depending on what size lobsters you have. (See above)
  5. The easiest way to tell if your lobster is done is to pull at one of its antennae. When it is fully cooked, it should pop-off in your hand with little to no resistance.
  6. Remove lobsters from pot and allow to rest and cool for at least five minutes.
  7. Melt butter in individual ramekins.
  8. Add lemon juice to the butter.
  9. Serve with lobsters, shell crackers, and a bowl for discarded shells.Remember this is not a race to see who can finish their lobster first.

Wednesday, January 21, 2015

Classic Dijon Chicken Salad with Grapes And Apples

What can I say about chicken salad, my go-to item at your typical lunch counter? It's something I've made so many countless times it's never occurred to me to write it down before. There is nothing I find quite as comforting as large chunks of perfectly moist chicken. Using bone-in chicken goes a long way to ensuring your chicken is moist. The fat on the skin keeps the moisture in and the bones add flavor, all of which makes it a little more forgiving.

First, some basics. There is no RIGHT recipe for chicken salad, but the principles should be: some mayo/creaminess to bind it all together, some crunch for texture, some sweetness with some fruit, some onions for tang, and some mustard for flavor. Everything else is variable. I have used herbs, and I have left the herbs out because I wanted to keep it simple or because at the end of the day I dislike all things anise and licorice flavor and tarragon is constantly flirting at that border. I have used Sriracha. I have roasted chicken breast from frozen and cut straight from a whole roast chicken. I have used leftover grilled chicken legs. I have bought a rotisserie chicken. They all work with slightly different flavor.

This is my favorite, where I substitute apples for the classic celery and include grapes for sweetness. I prefer green grapes, whose skins I find to be slightly less bitter, but red grapes work too and add a nice bit of color. You can get away with using relatively tart apples in this recipe, but if the skins are thick you should consider peeling the apples first. If you don't have honey mustard on hand, use 1/2 teaspoon honey to 2 tablespoons mustard. Honey is powerful stuff, so use a very very gentle hand. 

Three breasts will make 2 to 3 sandwiches.


Dijon Chicken Salad With Grapes & Apples

3 Bone-In Split Chicken Breasts (Or 1 rotisserie chicken)
2 In-Season Apples (not Granny Smith, try Fuji, Braeburn or Pinklady)
1/3 cup seedless Grapes
1/2 cup Mayonnaise
1/2 red onion 
1 tablespoon Dijon Mustard
2 tablespoons Honey Mustard
1/4 teaspoon cayenne
salt
pepper
1 tablespoon finely cut herbs (optional, parsley or chives)

Instructions

  1. If you are roasting the chicken, place the chicken on a sheet pan. Season the chicken generously with salt and pepper. Drizzle lightly with oil then roast for twenty minutes at 350 degrees. Let chicken cool completely.
  2. Cut the breast away from the bone and remove and discard skin.
  3. Cut chicken into 1" chunks and toss into medium sized bowl, making sure to remember to remove any cartilage or tough connective tissue you come across.
  4. Cut grapes into halves or quarters depending on the size of the grapes. Add to chicken.
  5. Peel apples, if desired.
  6. Cut apples into 1/2" cubes and add to bowl.
  7. Cut red onion into 1/4" pieces and add to mixing bowl. Toss lightly.
  8. Add mayonnaise, dijon mustard, honey mustard, cayenne, and pepper to taste. Add salt if needed.
  9. Mix ingredients until combined. Be careful not to overly mix so that most chunks of chicken remain in tact.
  10. Serve either on a sandwich with lettuce and red onion or separately.

Tuesday, November 25, 2014

Chermoula Marinated Pork Loin

Pork loin is all or nothing for me.  It’s either juicy, succulent, and full of delicious porky flavor, or it’s as dry and chewy as a hockey puck.  When done correctly, the loin is one of my favorite cuts of pork.  Tied and pan roasted, it makes for a roast as beautiful as it is tasty, perfect for a small dinner party.  But pork loin can be finicky.  Because it is relatively lean, it does have a tendency to dry out. And being pork, the loin needs lots of seasoning to be flavorful.

Before the pork loin goes anywhere near a pan, there are steps you can take to ensure that the final product will come out juicy.  First, get a high quality piece of pork.  Look for one in your butcher’s case that has good marbling, has most of its fat cap intact, and that still looks pink and fresh.  If the only pork loin you can find is vacuum sealed in plastic and labeled as “enhanced” pork (i.e., pork that has been injected with salt water), consider using this marinade on a nice pork chop instead.

Brining is an additional step you can take towards keeping your pork loin juicy.  I use a very basic brine for this recipe, because the pork loin is marinated after brining.  As an alternative recipe, try using the brine I call for in my Roast Chicken recipe.  Pan roast the loin as I do below and make a simple pan sauce with all of the delicious brown bits sticking the bottom of the skillet.  The end result would make a Frenchman proud.

Pork loin benefits from heavy seasoning and pairs great with big, intense flavors.  The chermoula marinade I use here – a potent North African marinade traditionally used to season vegetables – penetrates the pork with deep and complex flavors and imparts the loin with an attractive golden brown exterior when seared.

The chermoula calls for both fresh ginger and fresh turmeric.  You can substitute dried ground turmeric if you cannot find fresh, but the fresh ginger is essential. If you have never seen tumeric, it looks like small, orange fresh ginger that is as bright as a carrot when peeled and gets on everything it touches (see photos).  Grating the ginger, turmeric, onion and garlic on a Microplane grater or through the small holes of a box grater intensifies their flavors and will help to tenderize the meat.


Chermoula Marinated Pork Loin


Ingredients


1 boneless pork loin roast, 2-3 pounds

8 cups water
½ cup Kosher salt

1½ teaspoons cumin seeds
½ teaspoon coriander seeds
½ teaspoon black peppercorns
½ teaspoon red chile flakes
2 cloves garlic, grated
¼ cup grated yellow onion
½ teaspoon peeled and grated fresh ginger
1 teaspoon peeled and grated fresh turmeric, or ½ teaspoon ground turmeric
2 teaspoons unsmoked Spanish paprika
Grated zest of ½ lemon
2 tablespoons
2 tablespoons finely chopped flat-leaf parsley
finely chopped cilantro
3 tablespoons olive oil

Instructions


  1. Trim the pork loin of any excess fat, but be sure to leave most of the fat cap intact. Tie the loin at one inch intervals with butcher’s twine, making sure to tie it very tightly so that the roast will maintain its shape during cooking.
  2. Combine the water and salt in a large bowl and stir until the salt is completely dissolved. Add the trimmed and tied pork loin, cover, and refrigerate for 8-10 hours, or overnight.
  3. Toast the cumin and coriander seeds in a small skillet over medium heat, stirring frequently, until fragrant. Remove to the bowl of a spice grinder and add the peppercorns and chile flakes. Grind finely.
  4. Transfer the ground spices to a small bowl and add the garlic, onion, ginger, turmeric, paprika, lemon zest, parsley, cilantro and two tablespoons of the olive oil.  Stir to combine.
  5. Remove the pork loin from the brine and rinse under cold, running water. Dry thoroughly with paper towels.
  6. Rub the chermoula all over the pork loin, then wrap tightly with plastic wrap and refrigerate overnight.
  7. The next day, pre-heat your oven to 325° F. Unwrap the pork loin and wipe most of the chermoula off with your hands. Allow to sit at room temperature for one hour to temper.
  8. Heat the remaining tablespoon of olive oil in a large non-stick or cast iron skillet over medium high heat until shimmering but not smoking. Add the pork loin and sear on all sides until well browned, about 10 minutes.
  9. Turn the pork loin so that the fat cap is on top, and then place the skillet in the oven. Roast until center of roast registers about 135 degrees on an instant-read thermometer, 35 to 45 minutes.
  10. Remove the roast to a plate. Cover with tin foil and allow to rest for 20 minutes.
  11. After the roast has rested, transfer to a carving board. Cut the twine with scissors and discard. Slice the roast into ½ inch to ¾ inch slices. Poor any accumulated juices from the resting plate over the slices and serve.

Saturday, September 6, 2014

Fresh Plum Ice Cream

Plums are my favorite of the fruits. I could eat an entire bag of plums in one sitting. The problem is that for every delicious, sweet, dripping and perfect plum, I eat probably five or so tart, hard, and not-yet-ready plums in anticipation. Plum season is woefully short. It occupies only a few weeks in August/September (although plums are available much longer). So the trick is to have some ways to use those close-but-no-cigar, not-quite-ready plums to capitalize on their increased availability. 

While making this recipe with in-their-prime plums is ideal (the better your fruit, the better your ice cream), you can extract an incredible amount of sweetness out of the plums through boiling, even if starting with a tart plum. Just the smell and the beautiful color of the plums in the pot will tell you how wonderful your ice cream is going to be. The end result is not overly sugary or cloying (the downfall of many fruit or berry ice creams) or rich. This is a light summer fruit ice cream that we've served with our Meyer Lemon Yogurt Cake in the photos.


Adding plum ice cream to ice cream maker This ice cream is also notable because you do not make a custard and you do not use eggs. Simply create your fruit and syrup, add cream, and blend. If you're worried about accidentally cooking the eggs when making custard, but want something with cream and more body and smoothness than a sorbet, this is a great option. The lovely color is all natural from the skin of the plums (which, no, you do not have to peel the plums, and don't worry about slight bruising). Any type of plum will do. Pick the ones most in season. We used red plums, but black or any can work. The recipe was written in David Lebovitz's Perfect Scoop for wild plums. We substituted frambois for the kirsch due to what we had on hand.

Serve by itself, with fresh fruit, with cake, or however you want. It makes one quart of ice cream.


Plum Ice Cream


Ingredients

1 pound plums (whatever available, around 5-8 depending on varietal)
1/3 cup water
3/4 cup plus 2 tablespoons sugar
1 cup heavy cream
1/2 teaspoon kirsch or frambois


Instructions

  1. The night before, make sure bowl for ice cream maker is chilling in the freezer.
  2. Cut plums in half and remove pits.
  3. Cut each half in quarters (approximately 8 slices per plum).
  4. Place in medium (3 qt) non-reactive saucepan.
  5. Add water. The juices from the plums will create the rest of the necessary moisture.
  6. Cover and cook over medium heat for about 8-10 minutes or until tender and easily split without resistance by pressing with the back of a wooden spoon.
  7. Remove from heat and stir in sugar until dissolved.
  8. Cool to room temperature (about an hour)
  9. Once cool, puree in a blender with the heavy cream and framboise until smooth and peels have been broken down as much as humanely possible.
  10. Chill mixture, pref. overnight but at least six hours.
  11. After thoroughly chilling, start ice cream maker and slowly add plum mixture in a drizzle. Note, this is written for our fairly standard $50 Cuisinart ice cream maker. If your ice cream maker's instructions are different, follow the directions for your ice cream maker.
  12. Run ice cream maker until mixture is no longer visibly moving around the scraper, and then wait a couple minutes longer, up to but not over twenty minutes total. This particular ice cream has taken pretty much the whole twenty minutes when we've made it before. If it is still moving at twenty minutes, you should still take it out (unless your ice cream maker says differently). Move to quart sized container and freeze until ready to serve.

Sunday, July 13, 2014

Mexican Style Shrimp Cocktail

Just as our Brown Sugar and Citrus Cured Salmon has become a tradition at our winter celebrations, this sweet-and-spicy shrimp cocktail based on an octopus recipe from the Rick Bayless cookbook has proved to be an immensely popular item at our parties during the warmer months. The first time we served this dish, our guests finished the entire bowl before E.S. even got to try one shrimp! Also like the cured salmon, this recipe is very simple.

Unlike your traditional shrimp cocktail arrangement – in which cooked shrimp are hung on the edge of a container of cocktail sauce – this recipe calls for the shrimp to be tossed in the sauce ahead of time, which allows the flavors of the sauce to penetrate the shrimp. Don’t add the shrimp to the sauce more than three hours before serving the cocktail, or the shrimp will start to get soft.

Tomatoes charred under a hot broiler, and a large quantity of hot sauce form the base of the cocktail sauce. I prefer Valencia or Cholula brand hot sauce for this recipe, as both have a subtle horseradish kick that compliments the shrimp nicely. Brown sugar and sherry vinegar provide a sweet contrast that balances the spice in the hot sauce.

Using precooked shrimp purchased from your local fishmonger makes this recipe a breeze. Just whip up the sauce in your food processor, chill in the refrigerator, and then toss in the shrimp. It’s that easy. Of course, if you want to cook your own shrimp, that will work too. Either way, be sure to remove all bits of shell and tail from your shrimp.

Serve this shrimp cocktail as part of a buffet in a large bowl, or as a plated first course in small glass bowls, topped with freshly sliced avocado and chopped cilantro.


Mexican Style Shrimp Cocktail

Ingredients

1 red onion, sliced thin
1 pound ripe tomatoes (2 large or 6 plum)
3 garlic cloves, peeled
1 tablespoon olive oil
2 tablespoons sherry vinegar
2 tablespoons brown sugar
¼ cup Mexican hot sauce (such as Valencia or Cholula brand)
2 ½ pounds cooked shrimp, shells and tails removed
1 ripe avocado, cut into small chunks
3 tablespoons chopped cilantro


Instructions

1. Roast the whole tomatoes on a rimmed baking sheet about four inches below a very hot broiler until splotchy black and thoroughly soft, at least 5 minutes per side. Remove and cool.

2.While the tomatoes are cooling, set the oven temperature to 425 degrees. Spread the onion and whole garlic cloves on a baking sheet and drizzle with the olive oil. Toss to combine. Place in the oven and roast until richly browned, about 15 minutes, stirring a few times to ensure even browning.

3. Pull the blackened skins off of the tomatoes, and scoop them into a food processor. Pulse several times to chop them into small pieces. Scrape into a medium bowl.

4. Scoop the onion and garlic into the food processor (don’t bother to clean the bowl of the food processor between uses). Pulse until finely chopped and add to the bowl with the tomatoes.

5. Add the sherry vinegar, brown sugar and hot sauce to the bowl and combine with the chopped vegetables. Season to taste with salt (I usually add about 2 teaspoons). Chill the cocktail sauce in the refrigerator.

6. An hour or two before you want to serve the shrimp cocktail, add the cleaned shrimp to the bowl and toss to combine. Try a shrimp to see if the cocktail needs additional salt or hot sauce. Once you are satisfied with the seasoning, return the bowl to the refrigerator.

7. When ready to serve, transfer the shrimp and sauce to an attractive bowl and top with the avocado and cilantro. Alternatively, divide the shrimp and sauce among small glass bowls and top each bowl with a few chunks of avocado and some chopped cilantro. Serve with high quality tortilla chips.

Related: Look at our Chilled Cucumber and Avocado Soup recipe to see how to pit an avocado.

Sunday, July 6, 2014

Strawberry Torta (Strawberry and Cream Cake)

Recently, my parents celebrated their 50th wedding anniversary. My mother is Swedish and my parents met in Sweden, so naturally she requested a Swedish dessert. There is nothing more Sweden-in-Summer to me than fresh jordgubbar (strawberries) and fresh whipped cream, lightly sweetened but still a touch of tang. Swedish cooking is about highlighting fresh ingredients while they are still in season, and this cake is really all about highlighting the natural goodness of the strawberries. The cream is just slightly sweetened so as not to overwhelm the berries. Strawberry and Cream torta (cake) is a cross-cultural favorite, and a great way to celebrate Summer, special occasions, or just because. While in traditional Swedish recipes a sponge cake is used, in this recipe a chiffon cake creates a more buttery flavor while keeping the light structure of a sponge cake.


The most intimidating thing about making this cake is torting the cake- or dividing the cake into three layers. Even though it is a tall cake that requires a 2" tall pan or a springform pan, that takes a little precision from an admittedly clumsy person. The first time I made it I went with only two layers, but added mashed strawberry to the top layer, to be topped again with whipped cream. That was pretty good, and certainly was easier to manage with a knife, but I felt the cake to cream ratio could be a little better and that I needed to get comfortable cutting a single cake into three layers. This is particularly true if I ever want to learn how to make princess torta, the royalty of Swedish cakes.

So I went out and got myself a cake leveler. I try not to overdo it on the niche purpose baking goods, I really do. But I will say that this was a wise $7 investment if you're in for the layer cake long-haul. It took all the intimidation away, created nice, flat, even layers with a simple sawing motion. And is thin enough to tuck away in the baking gadgets drawer. I included a video on using the cake leveler below. You want to start just a little below where the top starts to crown (at the lowest point of the cake) for your first layer. If you are using the leveler and are having trouble getting it started, use the knife to start and then start sawing back and forth and gently rotating the cake.

The original recipe for this is from Cook's Illustrated, but I found the way they organized ingredient measurements to be confusing so I adjusted it for a better mis en place. I also am the type of person that always feels very guilty taking up a bunch of pantry space with a bag of cake flour, so I rewrote the recipe for all-purpose flour. If you have cake flour on hand, use 1 1/4 cup cake flour instead of the all purpose flour and omit the cornstarch from the recipe (1 cup cake flour=7/8 cup all purpose flour + 2 tablespoons corn starch). If you want to plan ahead, you can make the cake portion, free it in plastic wrap (at least double wrapped), then thaw 2 hours before you want to make the cake. If you want to make it the night before, leave cutting the cake to right before you are ready to decorate, cover in plastic wrap, and put in fridge for night.

Lastly, this particular cake that got photographed I made when friends brought over raspberries from their garden. So obviously I put the raspberries on the cake. You don't mess around with that. There's also raspberry in the Frambois we used (Chambourd) in place of Kirsch, due to Frambois being a little easier to locate, so it all works out.


Ingredients


For the cake
1 cup and 1 1/2 tablespoons All Purpose flour (If using cake flour, use 1 1/4 cup cake flour and omit the cornstarch)
2 1/2 tablespoons cornstarch
1 1/2 teaspoons baking powder
1/4 teaspoon table salt
1 cup sugar
2 large eggs, room temperature
3 egg yolks, room temperature
3 egg whites, room temperature
6 tablespoons unsalted butter, melted and cooled slightly
2 tablespoons water
2 teaspoons vanilla extract
plain bread crumbs (optional)

For the Strawberry Filling
2 pounds fresh strawberries (medium or large, about 2 quarts), washed, dried, and stemmed
5- 6 tablespoons sugar
2 tablespoons Kirsch or a Frambois like Chambourd
pinch table salt

 
For the Whipped Cream   
8 ounces cream cheese, room temperature 
1/2 cup sugar
1 teaspoon vanilla extract 
1/8 teaspoon table salt 
2 cups heavy cream (more local the better)

Instructions 

  1. FOR THE CAKE: Adjust oven rack to lower-middle position and heat oven to 325 degrees. Grease and line with a very light dusting of bread crumbs, (or flour if you don't want to be as Swedish about it) round 9 by 2-inch straight sided cake pan or 9-inch springform pan and line with parchment paper. 
  2. Set three tablespoons of the sugar aside for use later. 
  3. In medium mixing bowl, whisk flour, cornstarch, baking powder, salt, and rest of the sugar in mixing bowl. 
  4. Whisk in 2 whole eggs and 3 yolks, butter, water, and vanilla; whisk until smooth.
  5. In clean bowl of standing mixer fitted with whisk attachment, beat remaining 3 egg whites at medium-low speed until frothy, about 2 minutes. 
  6. With machine running, gradually add the reserved 3 tablespoons sugar. 
  7. Increase speed to medium-high, and beat until soft peaks form, about 2 minutes. 
  8. With a rubber spatula, stir one-third of whites into yolk batter to lighten. 
  9. Add remaining whites and gently fold into batter until no white streaks remain. 
  10. Pour batter into prepared pan and bake until toothpick or wooden skewer inserted into center of cake comes out clean, 30 to 40 minutes. 
  11. Cool in pan 10 minutes, then invert cake onto greased wire rack; peel off and discard parchment. Invert cake again; cool completely, about 2 hours, during which you can complete the filling and the cream.


  12. FOR THE STRAWBERRY FILLING: Halve 24 of best-looking berries and reserve. 
  13. Quarter remaining berries; toss with 4 to 6 tablespoons sugar (depending on sweetness of berries) in medium bowl and let sit 1 hour, stirring occasionally. 
  14. Strain juices from berries and reserve (you should have about 1/2 cup). 
  15. In workbowl of food processor fitted with metal blade, give macerated berries five 1-second pulses (you should have about 1 1/2 cups). 
  16. In small saucepan over medium-high heat, simmer reserved juices and Frambois until syrupy and reduced to about 3 tablespoons, 3 to 5 minutes. 
  17. Pour reduced syrup over macerated berries, add pinch of salt, and toss to combine. Set aside until cake is cooled. If you want to wait to whip the cream and decorate right before serving, you can pause here.


  1. FOR THE WHIPPED CREAM: When cake has cooled, place cream cheese, sugar, vanilla, and salt in bowl of standing mixer fitted with whisk attachment. 
  2. Whisk at medium-high speed until light and fluffy, 2 to 3 minutes, scraping down bowl with rubber spatula as needed. Reduce speed to low and add heavy cream in slow, steady stream; when almost fully combined, increase speed to medium-high and beat until mixture holds stiff peaks, 2 to 3 1/2 minutes more, scraping bowl as needed (you should have about 4 1/2 cups).


  1. TO ASSEMBLE THE CAKE: If using a large serrated knife, slice cake into three even layers. If only making a two layer cake, slice in half with knife. If using a leveler, set the leveler slightly below where the cake starts to crown at the lowest part of the cake if your oven is uneven to cut the first layer. Halve the remaining cake.
  2. Place bottom layer on cardboard round or cake plate bottom side up and arrange ring of 20 strawberry halves, cut sides down and stem ends facing out, around perimeter of cake layer. 
  3. Pour one half of pureed berry mixture (about 3/4 cup) in center, then spread to cover any exposed cake. 
  4. Gently spread about one-third of whipped cream (about 1 1/2 cups) over berry layer, leaving 1/2-inch border from edge, reaching the tips of the strawberry ring. 
  5. Place middle cake layer (or top layer if only doing two layers) on top and press down gently Whipped cream layer should become flush with cake edge. 
  6. Repeat with 20 additional strawberry halves, remaining berry mixture, and half of remaining whipped cream.
  7. Gently press last cake layer upside down on top. If doing only two layers, go to step 28.
  8. Spread remaining whipped cream over top.
  9. Decorate with remaining cut strawberries. 
  10. Serve, or chill for up to 4 hours.